zum Warenkorb 0,00 €
0
Klassische FBA
1. FBA- Full bust adjusment
Wir Frauen sind in unserer Vielfalt kein Standard. Das Tolle am Nähen ist, dass wir es trotzdem schaffen, perfekt sitzende Kleidungsstücke zu nähen. Mit Hilfe einer FBA machst du ein Kleidungsstück zu DEINEM perfekten Begleiter.
Hier zeigen wir dir, wie du an einem Oberteil oder Kleid ohne vorhandene Abnäher eine FBA machst. Du findest bei uns auch eine Anleitung zum Thema FBA bei Wiener Nähten, FBA bei vorhandenen Abnähern (in diesem Beitrag), FBA bei überschnittenen Ärmeln und SBA (small bust adjusment).
1. Full bust adjusment
In our diversity, we as women are not a standard. The great thing about sewing is that we still manage to sew perfectly fitting garments. With the help of an FBA, you turn a piece of clothing into YOUR perfect companion.
Here we show you how to do an FBA on a top or dress without existing darts. You will also find instructions on the subject of FBA for princess seams, FBA for existing darts (in this text), FBA for overlapping shoulders and SBA (small bust adjusment).
2. Was ist eine FBA und wann ist sie notwendig?
FBA steht für „Full Bust Adjusment“, also die Anpassung eines Schnittes an eine große Brust, um im Oberteil Mehrweite zu schaffen. Viele Schnitte sind für die Durchschnittskörbchengröße B gradiert. Bei der Auswahl einer Größe gilt zumeist, sich am Brustumfang zu orientieren. Hast du aber eine große Oberweite, wird das fertige Kleidungsstück dann an der Brust gut passen, am restlichen Körper aber zu groß sein. Besonders im Bereich der Schultern und Armausschnitte kommt es dann zu Passformfehlern. Nimmst du eine kleinere Größe, passt es zwar an Schultern und Armen aber nicht im Bereich der Brust. Das Oberteil spannt, die Nähte verlaufen nicht da wo sie sollen und es bilden sich unschöne Falten.
Anzeichen, dass du eine FBA brauchst:
Dein genähtes Teil passt im Taillen- und Hüftbereich, aber oben klafft der Ausschnitt auseinander oder springt auf?
Es entstehen Falten im Bereich der Achsel und der Seitennaht, die in Richtung Brust ziehen?
Du hast deine Größe nach deinem Brustmaß ausgewählt, im Brustbereich sitzt alles gut, aber an Hüfte, Taille und Schulter ist es zu groß?
2. What is an FBA and when is it necessary?
FBA stands for „Full Bust Adjusment“, i.e. the adaptation of a pattern to a large bust in order to create more space in the upper part. Many patterns are graded for the average B cup size. When choosing a size, it is usually important to look at the bust circumference. But if you have a large bust, the finished garment will fit well on the chest, but will be too big on the rest of the body. This leads to fitting errors, especially in the area of the shoulders and armholes. If you take a smaller size, it will fit on the shoulders and arms but not in the chest area. The upper part stretches, the seams do not run where they should and unsightly folds form.
Signs you need an FBA:
Your pattern fits in the waist and hip area, but the neckline gapes or jumps up at the top?
Are there creases in the area of the armpits and the side seams that pull towards the chest?
You chose your size based on your bust measurement, everything fits well in the bust area, but is it too big at the hips, waist and shoulders?
3. Größe für die FBA bestimmen + Brustpunkt
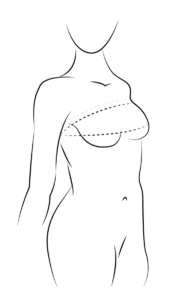
Ist dein Brustumfang im Verhältnis zu deinen sonstigen Maßen sehr groß, wählst du die Größe anhand der Oberbrustweite aus. Miss gründlich und unbekleidet den Umfang genau über deiner Brust (siehe Bild). Führe das Maßband von hinten nach schräg vorne unterhalb deinen Achseln genau über den Brustansatz und vergleiche diesen Wert mit der Maßtabelle. Das Messen klappt am besten, wenn dir eine zweite Person dabei hilft.
Beispiel:
Taille: 80
Hüfte: 99
Brustumfang: 106
Oberbrustweite: 98
Du wählst also nach Oberbrustweite die Größe 36 in der Maßtabelle und schaffst mit der FBA Platz für die Brust.
Jetzt wird ein bisschen gerechnet. Liegt deine Differenz zwischen Brustumfang und Oberbrustweite unter 5 cm ist keine Anpassung notwendig.
Brustumfang – Oberbrustweite
106 cm – 98 cm = 8 cm
Es ist also eine FBA nötig.
Wert der Anpassung bestimmen
Das Ergebnis (die Differenz) teilst du durch 2. Somit musst du im Beispiel an jeder Brustseite 4 cm Weite für die Brust hinzufügen.
Bei einem großen Busen benötigt das Vorderteil mehr Weite im vorderen Bereich, aber auch etwas mehr Länge nach unten hin, denn ein großer Busen verlängert die Strecke von der Schulter bis zum Saum.
Brustpunkt bestimmen
Bei vielen Schnitten ist der Brustpunkt nicht eingezeichnet und wird individuell bestimmt. Am einfachsten ist es, wenn du das Schnittteil an deinen Körper hältst. Übertrage es dafür am besten auf Folie oder Schnittmusterpapier. Trage für die Bestimmung die Unterwäsche/den BH, den du später auch unter der Kleidung trägst. Der Bruch liegt dabei in der Mitte deines Körpers und die Schulternaht auf dem höchsten Punkt deiner Schulter. Am besten geht das, wenn du ein enges T-Shirt trägst und die Schulter mit einer Stecknadel fixierst. Markiere dir dann die stärkste Stelle deiner Brust auf dem Schnittteil (üblicherweise ist das die Brustwarze).
3. Determine size for FBA
If your bust circumference is very large in relation to your other measurements, choose the size based on the upper bust measurement. Measure the circumference of your bust thoroughly and undressed (see picture). Run the measuring tape diagonally from the back to the front below your armpits exactly over the bust base and compare this value with the measurement chart. Measuring works best when a second person helps you.
Example:
waist: 80
Hip: 99
Chest circumference: 106
Upper bust: 98
So you choose size 36 in the measurement chart based on your upper bust size and use the FBA to create space for the bust.
Now a bit of calculation. If the difference between the chest circumference and the upper chest measurement is less than 5 cm, no adjustment is necessary.
Chest measurement – upper chest measurement
106cm – 98cm = 8cm
An FBA is therefore necessary.
Determine the value of the adjustment
You divide the result (the difference) by 2. So in the example you have to add 4 cm width for the breast on each side of the breast.
With a large bust, the front part needs more width in the front area, but also a little more length towards the bottom, because a large bust extends the distance from the shoulder to the hem.
Determine breast point
In many cuts, the breast point is not marked and is determined individually. It is easiest if you hold the pattern piece against your body. It is best to transfer it to foil or pattern paper. For the determination, wear the underwear/bra that you will later wear under your clothes. The break is in the middle of your body and the shoulder seam is at the highest point of your shoulder. This works best if you wear a tight t-shirt and fix the shoulder with a pin. Then mark the strongest part of your breasts on the pattern piece (this is usually the nipple).
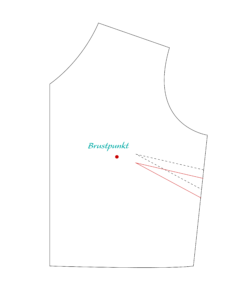
4. Anpassung- Hilfslinien einzeichnen
Zeichne dir 3 Linien:
- vom Brustpunkt eine Linie parallel zur vorderen Mitte bis zum Saum
- vom Brustpunkt zur Seitennaht im rechten Winkel zur ersten Linie
- vom Brustpunkt aus in das untere Drittel des Armlochs
Schneide an den Linien das Schnittmuster ein. Im Bereich der zweiten und dritten Linie wird der letzte Zentimeter nicht aufgeschnitten.
4. Alignment- Draw help lines
Draw yourself 3 lines:
- from the bust point a line parallel to the center front to the hem
- from the bust point to the side seam at right angles to the first line
- from the bust point into the lower third of the armhole
Cut the pattern along the lines. In the area of the second and third line, the last centimeter is not cut open.
5. Anpassung- Schnitteil aufschieben
Verschiebe nun das Schnittteil um deinen gemessenen Wert, indem du den aufgeschnittenen Teil im Ganzen nach unten ziehst, bis ein Spalt entsteht. Der entstandene Spalt soll deinem gemessenen Wert, in diesem Fall 4 cm, entsprechen. Achte darauf, dass die Linien parallel bleiben. Durch das Verschieben nach unten entsteht in der Seite ein Keil, der Saum ist verlängert.
5. Adaptation
Now move the pattern piece by your measured value by pulling the pattern piece as a whole down until there is a gap. The resulting gap should correspond to your measured value, in this case 4 cm. Make sure the lines stay parallel. Shifting it down creates a dart in the side, and the hem is longer.
6. Neues Schnitteil erstellen
Klebe das Schnittteil mit Klebeband auf ein Blatt und zeichne die sich nun neu ergebenen äußeren Linien nach. Markiere dir den Abnäher in der Seitennaht.
Ermittle nun erneut wie am Anfang beschrieben den Brustpunkt und zeichne von den Markierungen an der Seitennaht aus den Abnäher ein. Dieser sollte etwas vor dem Brustpunkt enden (je nach Größe 2-3 cm).
6. Create a new pattern piece
Glue the pattern piece to a piece of paper with adhesive tape and trace the newly created outer lines. Mark the dart in the side seam.
Now determine the bust point again as described at the beginning and draw the dart from the markings on the side seam. This should end slightly in front of the breast point (depending on size 2-3 cm).
7. Abnäher verschwinden lassen
Der Abnäher, der am unteren Saum entsteht, kann entweder genäht werden oder du lässt ihn in deinem neu eingezeichneten Brustabnäher verschwinden, indem du den Spalt unten durch Verschieben wieder schließt und den Brustabnäher somit noch etwas vergrößerst.
7. Make darts disappear
The dart that is created at the bottom hem can either be sewn or you can make it disappear in your newly drawn bust dart by closing the gap at the bottom again by moving it and thus enlarging the bust dart a little.
FBA bei vorhandenen Abnähern
Oftmals sind grade bei enganliegenden Schnittmustern bereits Abnäher im Schnitt enthalten, da auch ein kleinerer Busen Formgebung braucht. Wenn du mehr als ein B-Körbchen hast, wirst du dennoch etwas mehr Platz brauchen, damit dein Oberteil gut sitzt.
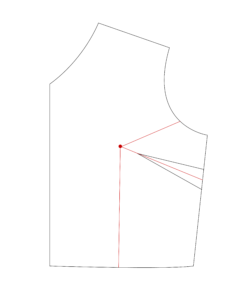
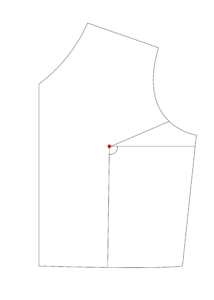
Wichtig ist zunächst, dass der vorhandene Abnäher mit deinem Brustpunkt übereinstimmt. Denn grade bei einer sehr großen Brust liegt der Brustpunkt oftmals etwas tiefer, als in standardisierten Schnitten vorgesehen.
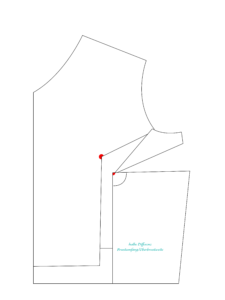
Der erste Schritt ist also, den vorhandenen Abnäher an deinen Brustpunkt anzupassen. Abnäher können im Ganzen verschoben werden. Die Größe des Abnähers und der Winkel bleiben dabei gleich. Der Abnäher sollte auf deinen Brustpunkt zulaufen und etwa 2 cm davor enden.
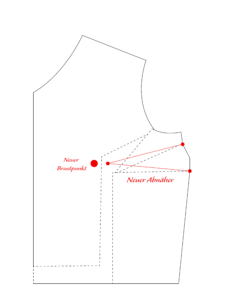
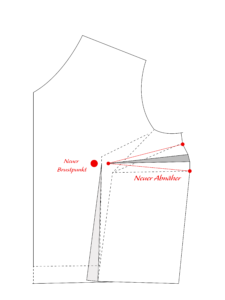
Im zweiten Schritt kannst du wie bei der FBA ohne Abnäher fortfahren. Du zeichnest wieder 3 Hilfslinien, wobei die zweite Linie nun mittig durch deinen vorhandenen Brustabnäher verläuft.
FBA with existing darts
It is often the case with tight-fitting patterns that darts are already included in the pattern, since smaller breasts also need shaping. If you have more than a B cup, you will still need a little extra room for your top to fit properly.
First of all, it is important that the existing dart matches your bust point. Because especially with a very large breast, the breast point is often a little lower than provided for in standardized patterns.
So the first step is to adjust the existing dart to your bust point. Darts can be moved as a whole. The size of the dart and the angle remain the same. The dart should converge towards your bust point and end about 2 cm in front of it.
In the second step you can continue without darts as with the FBA. You draw 3 auxiliary lines again, whereby the second line now runs in the middle through your existing bust dart.