zum Warenkorb 0,00 €
0FBA mit Wiener Nähten
1. Unsere Nova und die Wiener Nähte
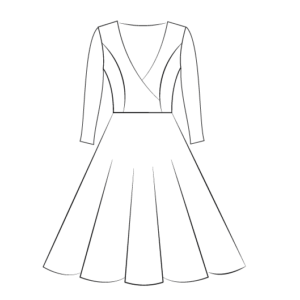
Die Nova besitzt am Oberteil Wiener Nähte. Wiener Nähte laufen aus dem Armloch in einem Bogen nach unten, im Gegensatz zu Prinzessnähten, welche an der Schulter entspringen. An der Naht treffen zwei geschwungene Stoffkanten aufeinander, die genau aufeinander abgestimmt sind und sich durch die gebogene Naht an der Körperlinie anlegen. Es ist wichtig, dass diese Nähte genau dort sitzen, wo sie gedacht sind, um eine optimale Passform zu ermöglichen. Jeder Körper ist anders. Ein Schnittmuster ist immer genormt und orientiert sich an gewissen Standards. Wir als Frauen sind in unserer Vielfalt aber kein Standard. Das tolle am Nähen ist, dass wir es trotzdem schaffen, perfekt sitzende Kleidungsstücke zu nähen.
Du findest bei uns auch eine Anleitung zum Thema klassische FBA und FBA bei vorhandenen Abnähern, FBA bei überschnittenen Ärmeln und SBA (small bust adjusment).
1. Our Nova and the Princess Seams
The Nova has princess seams on the upper part. The Princess seams curve down from the armhole. Two curved fabric edges meet at the seam, which are precisely matched to each other and are attached to the body line. It is important that these seams are placed exactly where they are intended for an optimal fit. Every body is different. A pattern is always based on certain standards. In our diversity, we as women are not a standard. The great thing about sewing is that we can sew perfectly fitting clothes.
You will also find instructions for classic FBA and FBA for existing darts, FBA for overlapping shoulders and SBA (small bust adjusment).
2. Was ist eine FBA und wann ist sie notwendig?
FBA steht für „Full Bust Adjusment“, also die Anpassung eines Schnittes an eine große Brust, um im Oberteil Mehrweite zu schaffen. Viele Schnitte sind für die Durchschnittskörbchengröße B gradiert. Bei der Auswahl einer Größe gilt zumeist, sich am Brustumfang zu orientieren. Hast du aber eine große Oberweite, wird das fertige Kleidungsstück dann an der Brust gut passen, am restlichen Körper aber zu groß sein. Besonders im Bereich der Schultern und Armausschnitte kommt es dann zu Passformfehlern. Nimmst du eine kleinere Größe, passt es zwar an Schultern und Armen aber nicht im Bereich der Brust. Das Oberteil spannt, die Nähte verlaufen nicht da wo sie sollen und es bilden sich unschöne Falten.
2. What is an FBA and when is it necessary?
FBA stands for “Full Bust Adjusment”, i.e. the adaptation of a pattern to a large breast in order to create more space in the upper part. Many patterns are graded for the average B cup size. When choosing a size, it is usually important to look at the chest circumference. But if you have a large breast, the finished garment will fit well on the chest, but will be too big on the rest of the body. This leads to fitting errors, especially in the area of the shoulders and armholes. If you take a smaller size, it will fit on the shoulders and arms but not in the bust area. The upper part stretches, the seams do not run where they should.
3. Größe für die FBA bestimmen + Brustpunkt ermitteln
3. Determine size for FBA + determine breast point
If your bust circumference is very large in relation to your other measurements, choose the size based on the upper bust measurement. Measure the circumference just above your chest. Guide the tape measure from the back under your armpits exactly over the breast and compare this value with the size chart. Measuring works best when a second person helps you.
Example:
waist: 80
Hip: 99
Bust circumference: 106
Upper bust: 98
So you choose size 36 based on your upper bust size and use the FBA to create space for your breasts.
Now a bit of calculation. If your difference is less than 5 cm, no adjustment is necessary.
Bust measurement – upper bust measurement
106cm – 98cm = 8cm
You divide this result by 2. So you have to add 4 cm width on each side of the chest.
Determine breast point
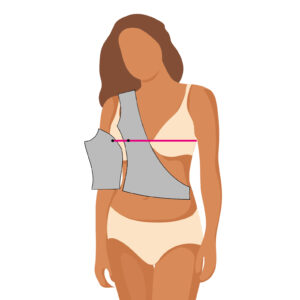
In many patterns, the breast point is not marked and is determined individually. It is the easiest if you hold the pattern piece against your body. The fold is in the middle of your body and the shoulder seam is at the highest point of your shoulder. Mark the strongest part of your bust on the pattern piece. With the Nova, you first use the front middle part and place the shoulder seam on the shoulder and the middle of the lower edge at the level of your bellybutton. Mark the breast point. Then put on the front side part and transfer the point at the same height.
4. Anpassung- Hilfslinien einzeichnen
- einmal vom Brustpunkt nach oben zur Spitze
- einmal in Richtung Taille
- einmal parallel zur Seite.
4. Alignment- Draw guidelines
Draw yourself 3 lines:
- once from the bust point up to the tip
- once towards the waist
- once parallel to the side.
5. Anpassung- Schnitteil aufschieben
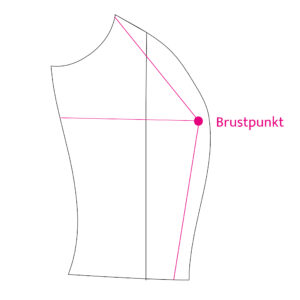
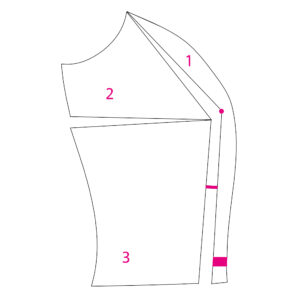
Verschiebe nun den Brustpunkt um deinen gemessenen Wert, indem du das im Bild mit „3“ markierte Teil im ganzen nach unten ziehst, bis ein Spalt zu Teil „1“ entsteht. Der entstandene Spalt (mit dem pinken Strich markiert) soll deinem gemessenen Wert, in diesem Fall 4 cm, entsprechen. Durch das Verschieben nach unten entsteht in der Seite ein Keil, der wie ein Abnäher aussieht. Die Wiener Naht schließt nun nicht mehr mit der unteren Schnittkante ab. Verlängere diese Strecke, indem du den unteren Teil abschneidest und nach unten verschiebst.
5. Adaptation
Now shift the breast point by your measured value by pulling the part marked with “3” in the picture down as a whole until there is a gap to part “1”. The resulting gap (marked with the pink line) should correspond to your measured value, in this case 4 cm. Moving it down creates a wedge in the side that looks like a dart. The princess seam no longer ends with the lower cut edge. Extend this stretch by cutting the bottom part and moving it down.
6. Neues Schnitteil erstellen
Erstelle dir aus dieser Vorlage dein neues Schnittteil.
6. Create a new pattern piece
Use this template to create your new pattern piece.
7. Abnäher verschwinden lassen
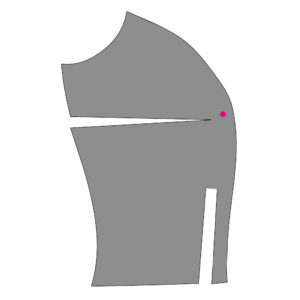
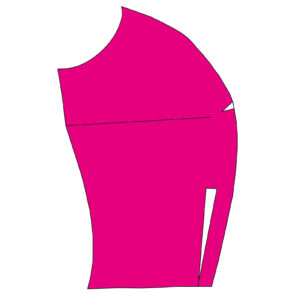
Im nächsten Schritt wird nun auch noch der seitliche Abnäher in die Wiener Naht verlegt. Dafür schneidest du den Abnäher bis kurz vor dem Brustpunkt auf und schneidest dann von der Wiener Naht aus auch noch einmal bis kurz vor den Brustpunkt. Schiebe nun den seitlichen Abnäher bündig nach oben und den schmalen Teil unten an seinen ursprünglichen Platz, damit die untere Strecke wo der Rock ansetzt wieder ihre ursprüngliche Länge hat. Der Abnäher ist weg und es entsteht ein Keil in der Wiener Naht, der die Gesamtstrecke verlängert und Platz für die Brust schafft.
7. Make darts disappear
In the next step, the side darts are also relocated to the princess seam. To do this, cut the dart just before the bust point and then cut again from the princess seam until just before the bust point. Now push the side dart up and the narrow part down into its original place so that the lower section where the skirt joins has its original length again. The dart is gone and a wedge is created in the princess seam, which lengthens the bustline and creates space for the breast.
8. Vorderes Mittelteil anpassen
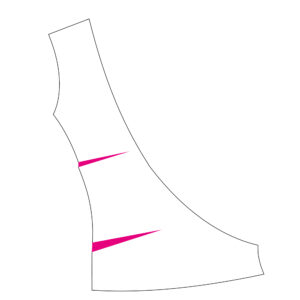
Da die Strecke der Wiener Naht nun länger ist als im ursprünglichen Schnittteil musst du nun auch das vordere Mittelteil verlängert werden. Miss dafür die komplette Strecke der Wiener Naht mit einem Maßband aus und verlängere das vordere Mittelteil entsprechend der Differenz, indem du dir einmal im oberen und einmal im unteren Teil der Wiener Naht eine Linie parallel zur Unterkante ziehst, diese aufschneidest und beide soweit aufschiebst, bis die Differenz ausgeglichen ist.
8. Adjust front center panel
Since the stretch of the princess seam is now longer than in the original pattern part, you now have to lengthen the front center part as well. To do this, measure the entire length of the princess seam with a tape measure and lengthen the front middle part according to the difference by drawing a line parallel to the bottom edge once in the upper and once in the lower part of the princess seam, cutting it open and pushing both of them open until the difference is settled.


Diana Schlemmer am :
Wow – perfekt erklärt
graliontorile am :
As a Newbie, I am constantly exploring online for articles that can benefit me. Thank you
ninaringes am :
Vielen Dank dafür! Jetzt hat es „Klick“ gemacht 🙂